

Linkin
-
Posts
155 -
Joined
-
Last visited
-
Days Won
36
Posts posted by Linkin
-
-
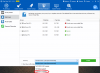
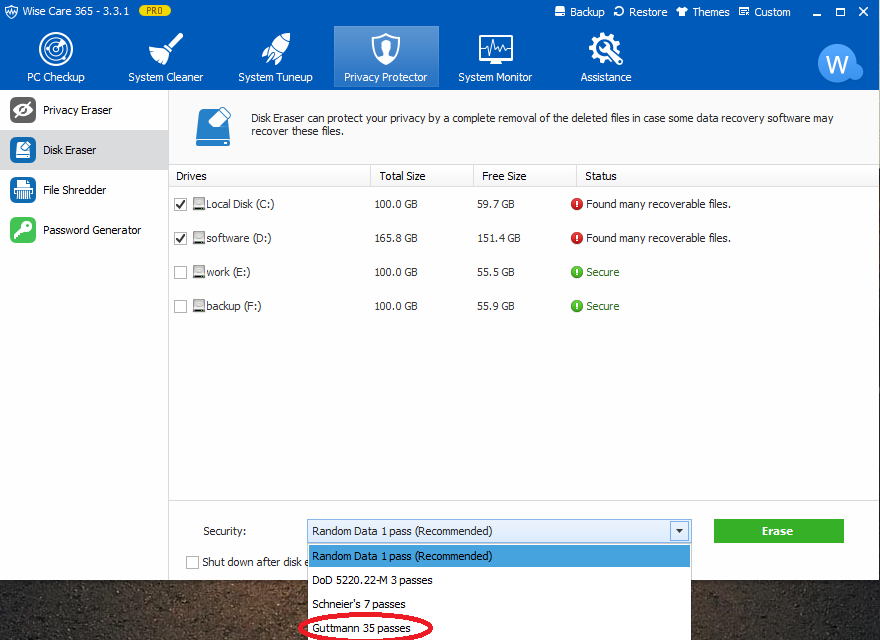
It is quite a good option to donate the old computer to schools and charity organizations, but before you actually do it, one thing you care about the most is the private or important information in the computer, can it be restored and seen by the prying eyes. Here I strongly suggest you have a complete cleanup with Wise Care 365 Pro and erase the disk with Disk Eraser in Privacy Protector column of Wise Care 365, do remember to choose 35 passes. Then all the information deleted and cleaned will not be restored.
-
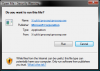
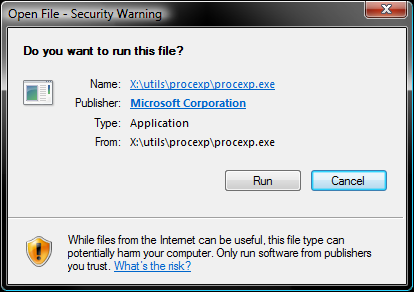
To Enable or Disable "Open File Security Warning" for Specific File Types using the Local Group Policy Editor
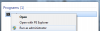
NOTE: You must be logged in as an administrator to be able to do this option.1. Open the all users, specific users or groups, or all users except administrators Local Group Policy Editor for how you want this policy applied.
2. In the left pane, click on to expand User Configuration, Administrative Templates, Windows Components, and Attachment Manager.3. To Enable the "Open File Security Warning"
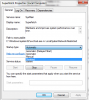
A) In the right pane, double click on Do not preserve zone information in file attachments.
 Select (dot) either Not Configured or Disabled, and click on OK.
 NOTE: Not Configured is the default setting.
C) In the right pane, double click on Inclusion list for low file types.
D) Select (dot) either Not Configured or Disabled, and click on OK.NOTE: Not Configured is the default setting.
4. To Disable the "Open File Security Warning"
A) In the right pane, double click on Do not preserve zone information in file attachments.
Select (dot) Enabled, and click on OK. C) In the right pane, double click on Inclusion list for low file types.
D) Select (dot) Enabled, then copy and paste the extensions below exactly as is into the Options box and click onOK.NOTE: These are the most common file extensions for this. If you like, you could add or remove file extensions to or from the list at anytime for those that you want to or do not want to get a Open File - Security Warning for.
Code:.avi;.bat;.com;.cmd;.exe;.htm;.html;.lnk;.mpg;.mpeg;.mov;.mp3;.msi;.m3u;.rar;.reg;.txt;.vbs;.wav;.zip;
5. Close the Local Group Policy Editor window.
-
Does it seem like your laptop’s battery charge runs out sooner than it should? Well, it seems like they always do to me.
Assuming that the laptop battery isn’t defective, there are a number of power settings that you can tweak in order to make a charge last as long as possible.
The key is determining which settings to tweak in order to gain the most benefit without hampering your ability to use your laptop effectively.
Windows includes a fantastic hidden tool that can help you decide which power settings you can safely tweak and which ones to leave as they are. This tool creates what’s known as a “Power Efficiency Report”, and here’s how to use it:
If your laptop is running Windows 7
1 – Click the Start orb.
2 – Type cmd into the Search box.
3 – Find cmd.exe in the list of search results, then right-click on it and click Run as Administrator.
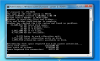
4 – Type (or copy and paste) the following at the command prompt:
powercfg -energy -output \Energy_Report.html
Then press Enter
After about 60 seconds the report will be ready to view. The steps below explain how to view it…
5 – Press the Windows+E key combination to open Windows Explorer.
6 – Navigate to the root folder of the C: drive and double-click the Energy_Report.html file.
7 – Read the Analysis/Errors section (look for the text with the colored background) to see which power settings can be changed in order to make your laptop run more efficiently.
If your laptop is running Windows 8/8.1
1 – While on the Start Screen, press the Windows+S key combination to open a Search box.
2 – Type cmd into the Search box.
3 – Find Command Prompt in the list of search results, then right-click on it and click Run as Administrator.
4 – Type (or copy and paste) the following at the command prompt:
powercfg -energy -output \Energy_Report.html
Then press Enter.
After about 60 seconds the report will be ready to view. The steps below explain how to view it…
5 – Press the Windows+E key combination to open File Explorer.
6 – Navigate to the root folder of the C: drive and double-click the Energy_Report.html file.
7 – Read the Analysis/Errors section (look for the text with the colored background) to see which power settings can be changed in order to make your laptop run more efficiently.
Bonus Tips: It is suggested that you keep up to 20% free disk space to keep your laptop fast and at low power consumption. And a weekly disk defragment with wise care 365 is also a good option for reducing the power consumption of your laptop battery.
-
If a Windows system is badly infected with malware, running an antivirus from inside Windows often won’t help. You can more easily find and purge malware by scanning from outside Windows.
Malware can hide itself on an infected system, avoiding detection. Other malware may attempt to battle the antivirus software, preventing it from properly installing or scanning. This is why it’s important to catch malware before it infects you.
Boot Into Safe Mode
Safe Mode isn’t completely outside of Windows, so it may not help you if a malware has deeply infected your system files. In Safe Mode, Windows won’t load third-party startup programs or hardware drivers. If malware is running when you boot into Windows normally, it shouldn’t automatically run when you boot into Safe Mode.
From this minimal environment, you can install an antivirus program, scan for malware, and remove it. If you already have an antivirus program installed and it’s failing to remove malware — or the malware is returning after it’s removed — you may have to boot into Safe Mode to remove the malware properly.
To enter Safe Mode on Windows 7 or earlier, restart your computer and repeatedly tap F8 at the start of the boot-up process. Select Safe Mode or Safe Mode with Networking in the menu that appears. Normal Safe Mode offers no Internet access so you’ll have to install an antivirus from a USB drive or other removable media, while Safe Mode with Networking offers Internet access so you can download and update an antivirus from within Safe Mode. Log into your computer, download and install the antivirus software, and run it.
On Windows 8 or later, press Windows Key + I to open the Settings charm pane. Press and hold the Shift key as you click the Restart option under the power button. Your computer will restart into a special boot options menu. Click Troubleshoot > Advanced Options > Startup Settings > Restart. On the Startup Settings screen, press F4 or 4 to enter Safe Mode or press F5 or 5 to enter Safe Mode with Networking.
Restart your computer when you’re done to leave Safe Mode.
Use an Antivirus Boot Disc
Antivirus companies often create boot discs you can use to scan and repair your computer. These tools can be burned to a CD or DVD or installed onto a USB drive. You can then restart your computer and boot from the removable media. A special antivirus environment will load where your computer can be scanned and repaired.
This is all happening outside of Windows — some of these discs are even based on Linux — so the malware won’t be running while this happens. This allows the antivirus to detect rootkits and other normally hidden types of malware, as well as remove malware that would normally try to defend itself.
Remove the Hard Drive and Connect it to Another PC
If you’re dealing with a desktop PC or another computer that allows you to easily remove the hard drive, you don’t have to leave it inside your computer. Open the computer, remove the drive, and connect it to another PC. You’ll then have access to all the files on the hard drive — assuming it wasn’t encrypted, of course.
Whatever the operating system on your other computer — Windows, Linux, or even Mac OS X — you can install antivirus software and use it to scan the secondary drive for malware. This malware can be found and removed from the other operating system, so the malware won’t be running and can’t fight back as you remove it.
All these methods allow you to gain the upper hand over malware running on your PC. Rather than fighting the malware on its own terms, this method allows you to freeze everything happening on your main operating system and carefully clean it up from the outside.
Of course, if your computer does become infected with malware, there’s no way to be completely sure the all malware is gone. For this reason, it’s often a good idea to reinstall Windows — or use the Refresh or Reset features on Windows 8 — after a computer becomes badly infected. You’ll get a clean system with no malware so you’ll know for sure your computer is safe. You also won’t have to waste any time attempting to find and remove malware. If you have backups of your important files, this process often won’t take too long.
-
A shortcut enables you to quickly access a file, folder, drive, or program on your computer. This post will introduce four methods of adding shortcuts to your desktop.
For Websites
Method One:
1. Right click on your desktop, click the New option and select Shortcut.
2. If you want to create a shortcut for your favorite site like Google to your desktop, you can add its URL to Type the location of the item box.
3. Type a name for this shortcut and click Finish button.
Method Two:
1. Narrow your browser first, and open a website randomly.
2. Then move your mouse to the icon in address bar, and then left click and drag it onto your desktop.
For Files/Folders/Programs
Method One:
1. Right click on your desktop, click the New option and select Shortcut.
2. In the Create Shortcut dialog window, click Browse button and locate the program, file, folder to the box, then click Next button and click OK.
Method Two:
Double click on Computer, locate a file you want. And then right click your program and move toSend to, then select Desktop (create shortcut).
Method Three:
Double click on Computer, locate a program you want. And then use mouse to adjust the size of the window. Left click the program, drag it onto your desktop and release the mouse. Finally, a shortcut is created.
Method Four:
Use your mouse to left click and drag a program you want onto your desktop, and then hit Shift + Ctrl keys.
-
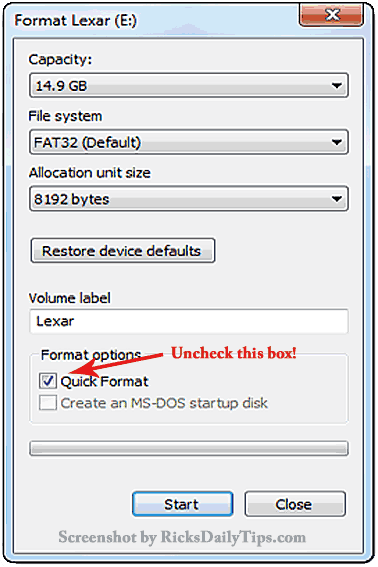
It’s actually quite easy to recover deleted files using a free file recovery program such as Wise Data Recovery. But did you know that files can even be recovered from flash drives that have been formatted? Well, it’s true, and it’s just as easy as recovering files that have been “deleted”.
If you format your drives using the “Quick Format” option, the files on the drive won’t actually be over-written as the drive is formatted. Instead, only the “pointers” to the files are wiped out, leaving the files themselves intact and easily recoverable.
This is usually not a problem, but if some of the files on a formatted drive are sensitive in nature, anyone at all could use a file recovery program to retrieve them.
Luckily, there’s a very simple solution if you really want to overwrite everything on a drive to prevent your files from being recovered. Simply uncheck the “Quick Format” option in the Format dialog box before you click the “Start” button. Refer to the screenshot below:
Bottom line: Format your flash drives without the “Quick Format” option and you’ll be able to rest assured that your files cannot be recovered by someone else.
-
Formatting the Hard Drive Without Reinstalling Windows 7
Formatting the Hard Drive by Reinstalling Windows 7
You may have a PC that has been infected with viruses or spyware, and you find it has become too slow and difficult to use. Or you may have a blank hard drive you need to set up. In this case, you may need to reformat your hard drive or to reinstall Windows 7. Follow the steps below to reformat Windows 7.
Method 1 of 2: Formatting the Hard Drive Without Reinstalling Windows 7
Part One: Partitioning the Hard Drive
1. Backup all your files, drivers and settings so that you can restore them later.
2. Find all your installation discs or product keys for the programs you want to keep so that you can restore them after the installation is complete.
3. Partition your hard drive. This means dividing the hard drive into parts and making the parts available to the OS (Operating System).
4. Click on “Start” and then Control Panel.
5. Click on “Administrative Tools” in the System and Security window.
6. Double-click on “Computer management.”
7. Click on “Disk Management.”
8. Find the drive you want to partition. It may be labeled Disk 1 or say “unallocated.”
9. Right click on the “unallocated” space and check “New Simple Volume.”
10. Click “Next” and “Next” again to confirm the size of the partition. You can choose the entire size of the hard drive or you could choose to create several partitions at this point, the total of which equals the size of the drive.
11. Assign a drive letter. You can choose any letters other than A or B.
12. Click “Do not format this volume” and then “Next.”
13. See the summary that pops up of your chosen partition options and check that they are correct.
14. Click “Finish.”
Part Two: Formatting the Hard Drive
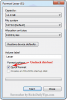
1. Find the drive you want to format from Disk management.
2. Right click on the correct drive and click “Format.”
3. Name the drive. For example, name it “Music.”
4. Choose “NTFS” for the file system.
5. Choose an “allocation unit size.” You can pick “Default” here.
6. Uncheck “Perform a quick format,” so that you can choose a standard format and that all sectors are checked for errors.
7. Uncheck “Enable file and folder compression.”
8. Click “OK.”
9. Click “OK” when you see “Formatting this volume will erase all data on it.”
10. Watch the formatting take place. You will see the progress.
11. See that the status has changed to “Healthy.”
12. Repeat these steps if you want to format other drives.
Method 2 of 2: Formatting the Hard Drive by Reinstalling Windows 7
1. Backup all your files and settings so that you can restore them later.
2. Find your Windows 7 product key: This should be printed on a sticker on your PC or on the documentation that was included with your PC. You will need this product key to reinstall Windows. If you do not have the installation discs, they can be obtained from Microsoft at microsoftstore.com/store/msusa/en_US/DisplayHelpPage. You download the Windows 7 ISO file to a DVD or USB flash drive.
3. Start your computer. Let Windows start and insert the Windows 7 USB flash drive or installation disc
4. Shut down your computer.
5. Restart your computer.
6. Press any key when you see the prompt.
7. Enter your language and other preferences in the “Install Windows” window, and then click “Next.”
8. Accept the license term and click “Next.”
9. Click “Custom” on the “Which type of installation do you want?” window.
10. Click “Drive Options Advanced” on the “Where do you want to install Windows?” window.
11. Click any partition that you want to change, clicking the formatting option you want to perform.
12. Click “Next” when you have finished formatting.
13. Follow the instructions to finish installing Windows 7. You will name your computer and set up a user account.
14. Click “Activate Windows online now.” If you are prompted for an administrator password, type the password or provide confirmation.
15. Activate your Windows 7 by typing your Windows 7 product key when prompted, click “Next,” and then follow the instructions or activate by clicking “Start,” “Computer,” “Properties” and “Activate Windows Now.”
16. Install your anti-virus software and enable the Windows Firewall. (Start, Control Panel, Windows Firewall.)
17. Install all your programs, hardware and backed up files.
Warnings
Formatting does not erase all the contents of a hard drive securely. It is possible for someone to recover data from a formatted drive.
-
Govome.com is an adware program which can be take over your all the browsers and set as your homepage and gives you sponsored advertisement.
Govome.com is also categorized is a browser hijacker and homepage redirect program. It can corrupts and control all popular web browser including Mozilla Firefox, Internet Explorer, Google Chrome etc. It enters into your computer without your permission. This is ads-supported search engine.
Once Govome.com is installed into your computer, this dangerous application alters some of computer’s settings, including the homepage, default search engine and similar settings. Your computer and internet speed become slow than usual. You will faced lot’s advertisements and sponsored links in your search result. Many unwanted plugins are automatically installed with your web browser.
Govome.com comes into your computer via free software packages from the internet like free videos, free games etc. You should always remember that download free software packages from Internet is the most common way for your computer to be infected with Govome.com. So you should pay attention when you download a free software packages from internet. It may come together with other malicious programs or may even be installed together with freeware and shareware
Govome.com is not a virus in technical terms. however, Govome.com does exhibit lots of malicious programs. It is categorized as a browser hijacker. The industry generally refers to it as a “PUP,” or potentially unwanted program.
Here is how to do it:
Start Google Chrome, click on options icon (Located in very top right side of the browser), click on Settings. You will get a configuration page.
Under configuration page find a option named as “Open a specific page or set of pages” click on their Set Pages. A another window will come up. Here you will appear the bunch of URL’s under “Set pages”. Delete all them and then enter only one which you want to use as your home page.
In the same configuration page click on Manage search engines button. Delete all the search engines from there, just keep only www.google.com as your default search Engine.
Remove unwanted extensions from Google Chrome:
Start Google Chrome, click on options icon (Located in very top right side of the browser), then click on Tools then, click on Extensions.
You will get a configuration page. which have installed all the extensions, Remove Govome extension & also remove all the unwanted extensions from there. To remove them, click on remove (recycle bin) icon
Close all Google Chrome browser and restart.
-
There are a lot of issues and scenarios that we commonly encounter with computers. It doesn't matter what operating system, brand, or architectural structure of the motherboard we have, may it be a desktop, laptop, or a netbook computer. Some common reasons why a computer crashes are due to hardware failure or malfunction, corrupted program files and/or drivers, virus infections, and overheating.
This article will discuss the common causes why a computer experiences overheating. To briefly define overheating, this is when a piece of hardware on your computer generates enough heat, which will simply cause the hardware component to malfunction or break down. A common scenario where a computer malfunctions due to overheating is when the user operates it for some time without proper ventilation.
So why do computers overheat and what are the symptoms? How do we avoid such problems?
These are the following symptoms when a computer is overheating:
The system tends to restart or switch off by itself while being use. If ever the CPU temperature is too high, this causes the system to reboot once it exceeds the maximum temperature allowed to withstand heat.
The system application would sometimes become unresponsive or sluggish. Either the screen would tend to freeze so you would have to power it down by pressing the power button for a few seconds or unplugging the power cord to start it up again.
The following are causes why computers overheat:
The CPU fan is not working due to a problem with the power supply.
The CPU fan is faulty.
Dust or small particles impedes and clogs the CPU fan, which causes poor air circulation.
The location of your computer does not have proper ventilation due to objects that blocks the airflow.
Overclocking the computer can also cause overheating since it requires greater power consumption, which generates more heat.
To avoid computers from overheating, make sure to do the following:
Don't forget to clean your computer regularly. Make sure to remove dust accumulating on your computer to avoid clogging and blocking the fan’s air flow.
Place the computer on a spot that doesn't have any obstruction, which can affect the fan’s air flow. This will provide proper ventilation to your computer.
Make sure that the fan is working properly on your computer.
Check the heat sink and make sure to apply thermal paste before properly reseating it. A thermal paste is a substance form, which helps the computer CPU to improve heat conduction. There are three types of thermal paste that you can use namely metal, ceramic, and silicon.
Sometimes, it is necessary to install an additional fan on the computer to avoid overheating the components on the motherboard.
I hope this article would be of help, especially if you encounter any issues that I have mentioned above.
-
Step I – Download Windows 7 SP1 ISO pack
The first step is very simple.
You need to download Windows 7 Operating System ISO pack.
But if you already have Windows 7 ISO file then well and good. You can easily move to the Next Step.
Step II – Download Windows 7 bootable USB tool
If you’ve downloaded the Windows 7 OS or you already have it. You further need to download Windows 7 USB/DVD Download Tool. (Download link: http://images2.store.microsoft.com/prod/clustera/framework/w7udt/1.0/en-us/Windows7-USB-DVD-tool.exe)
This tool is responsible to transfer Windows 7 OS into your USB pen drive.
Download it and keep it on your desktop.
Step III – Attach a USB Pen drive
Well the most obvious step here is to attach a USB Pen Drive.
After you attach your pen drive. Format it.
Right click on Pen-Drive drive; click on format; un-tick Quick Format and format your USB pen drive. (As easy as I said)
Step IV – Open Windows 7 USB/DVD Download Tool
This is how the Windows 7 USB/DVD Download Tool looks like. A simple basic tool.
After you open the tool. Click on Browse and locate the Windows 7 OS ISO file and click on Next.Since we need to create a Windows 7 bootable USB; click on USB device.
The software will automatically detect every USB Pen Drive connected to your computer. Select the one in which you want to copy Windows 7 OS ISO file and click on Begin Copying.
If you haven’t format the pen drive. The tool will ask your permission to erase data from it and will immediately start the copying process and create a Windows 7 bootable USB.
-
One of the most persistent myths about Windows is that you need to reinstall the operating system regularly to keep it running at top performance. Let’s take a look at the real problem and how to fix it.
Today we’re talking about the myth that Windows slows down over time, and how to solve the problem. The reality is that Windows doesn’t slow down if you just take care of your PC a little more. Follow these procedures, and you won’t have to wonder if spending time installing from disc, and re-installing your essential applications is really necessary.
What Does Slow Windows Down Over Time?
I’m not going to sit here and tell you that your Windows PC will never slow down — because for many people, they almost always do. What actually slows your PC down are too many poorly written applications that stay resident in memory and waste CPU cycles, having too many badly written low-level applications that hook into Windows, or running more than one antivirus application at a time. And of course, if you’ve run your PC’s hard drive out of space, you can hardly blame Windows for that.
If you aren’t getting the picture, the problem is usually the person behind the keyboard that installed too many junk applications in the first place. More gently put, it’s often that (very well-meaning) person’s gradual easing of their safeguards and cleaning regimens as time goes by.
1. Stop Installing Junk Applications
Installing software should be thought of like feeding your PC. If you constantly feed your PC garbage apps, it’s going to get sick and won’t be able to run fast anymore. These poorly written applications clutter your drive with unnecessary DLL files, add always-resident Windows services when they don’t need to, bloat up your registry, and add useless icons to your system tray that waste even more memory and CPU cycles. Usually you can get away with using a few terrible applications, but as you continue to install more and more of them, your PC will slow down to a crawl.
2. Be Smarter About What You Do Install
You should keep in mind that we aren’t trying to tell you to install every single one of them at the same time-just install the applications that you actually need and you’ll generally prevent the dreaded format and reinstall.
Here’s a few tips to help you know what applications you should be careful with:
Apps that function as an Explorer plug-in, because they directly hook into the shell and any problem will make your entire PC slow or in the worst case, crash repeatedly.
Antivirus applications are notorious for slowing your PC down, and you should never, ever, ever use more than one real-time antivirus application at a time. We recommend Microsoft Security Essentials as a free, fast and awesome antivirus tool.
Make sure to install official system drivers from the manufacturer website. Drivers have a huge impact on performance, and you want to have stable, updated drivers.
You can consider the idea of using portable applications wherever possible, since their self-contained nature means they won’t clutter up the rest of your PC with things you don’t need.
3. Keep Your Computer Clean And Trim
Once you’ve rid yourself of your junk application habit and resolved to only use healthy, useful applications, you’ll want to make sure to keep your PC clean of any remaining clutter that doesn’t need to be there. Your best bet is to set up Wise Care 365 to run automatically on a schedule, so you don’t have to remember to do it. With all of this automated file deletion going on, your hard drive is likely to get a bit fragmented.
-
How You Might See the 403 Error
403 Forbidden error messages are sometimes customized by the websites they appear on but for the most part, you'll see them in one of the following ways:
"403 Forbidden"
"HTTP 403"
"Forbidden: You don't have permission to access [directory] on this server."
"Forbidden"
"Error 403"
"HTTP Error 403.14 - Forbidden"
"Error 403 - Forbidden"
"HTTP Error 403 - Forbidden"
The 403 Forbidden error displays inside the browser window, just as web pages do. 403 errors, like all errors of this type, might be seen in any browser on any operating system.
In Internet Explorer, a The website declined to show this webpage message indicates a 403 Forbidden error. The IE title bar should say 403 Forbidden or something similar.
403 errors received when opening links via Microsoft Office programs generate a Unable to open . Cannot download the information you requested. message inside the MS Office program.
Note: Microsoft IIS web servers provide more specific information about the cause of 403 Forbidden errors by suffixing a number after the 403 as in HTTP Error 403.14 - Forbidden which means Directory listing denied. You can see a complete list here.
How To Fix the 403 Forbidden Error
{C}1. {C}Check for URL errors and make sure you're specifying an actual web page file name and extension, not just a directory. Most websites are configured to disallow directory browsing so a 403 Forbidden message when trying to display a folder instead of a specific page is normal and expected.
Important: This is, by far, the most common reason for a web site to return the 403 Forbidden error. Be sure you fully explore this possibility before investing time in the troubleshooting below.
Tip: If you operate the website in question, and you want to prevent 403 errors in these cases, enable directory browsing in your web server software.3. Log in to the website, assuming it's possible and appropriate to do so. A 403 Forbidden message could mean that you need additional access before you can view the page.
Typically, a website produces a 401 Unauthorized error when special permission is required but sometimes a 403 Forbidden is used instead.4. Clear your browser's cookies, especially if you typically log in to this website and logging in again (the last step) didn't work.
Note: While we're talking about cookies, be sure you have them enabled in your browser, or at least for this website, if you do actually log in to access this page. The 403 Forbidden error in particular indicates that cookies may be involved in obtaining proper access.1. Contact the website directly. It's possible that the 403 Forbidden error is a mistake, everyone else is seeing it too, and the website isn't yet aware of the problem.
See my Website Contact Information list for contact information for lots of popular websites. Most sites have support-based accounts on social networking sites, making it really easy to get a hold of them. Some even have support email addresses and telephone numbers.
Tip: Twitter is usually abuzz with talk when a site goes down completely, especially if it's a popular site. The best way to focus in on talk about a downed site is by searching for#websitedown on Twitter, as in #amazondown or #facebookdown. While this trick certainly won't work if Twitter is down with a 403 error, it's great for checking on the status of other downed sites.2. Contact your ISP if your still getting the 403 error, especially if you're pretty sure that the website in question is working for others right now.
It's possible that your public IP address, or your entire Internet Service Provider, has been blacklisted, a situation that could produce a 403 Forbidden error, usually on all pages on one or more sites.
Tip: See my How To Talk To Tech Support for some help on communicating this issue to your ISP. -
5 – Install AdBlock to Block Advertisements
Advertisements ‘hidden’ behind pages can interfere with your browser’s working and seriously dampen its performance. Useful resources are wasted, and surfing speed is considerably reduced by these unnecessary commercials. To help with your cause, find a free extension on Chrome Web Store that blocks any ad from bombarding your screen and keeps your web expedition clean.
Follow the script below to install an ad blocker extension from the chrome web store:
Log in to the address chrome.google.com/webstore
In the search box, type Ad Blocker. Press Enter
Locate and click the one with better rating from the search results
Once the extension windows pops, click the Free button
Confirm your decision by clicking Add
6 – Manage your priorities
Windows allows its users to set higher priority to applications that demand more computer resources and extra CPU attention. Using this feature, you can give greater preference to Chrome over other processes and increase its urgency significantly.
Here is the procedure for prioritizing chrome:
Start your browser
Simultaneously, launch Task Manager by pressing Ctrl + Shift+ Esckey
Click Details tab from the top
Locate chrome.exe and right-click it
Hover over Set priority and choose Above Normal or High
7 – Monitor internet usage using Google Chrome Task Manager
Chrome comes with a separate Task Manager that allows you to keep a watch on all internet applications and processes. It will show you the usage of CPU/Memory/Network/etc. by your browser, tabs, extensions, plug-ins, and other similar utilities. Useful when troubleshooting, this monitoring tool can help ensure you check your Chrome utilization efficiently and disable or close any plugin or tab you feel is unwanted.
Perform these steps to observe your Chrome Task Manager:
In Google Chrome window press Shift + Esc key to launch Task Manager
See the Memory, CPU, and Network columns to view and analyze the resource usage by each sub-process of chrome
If you want to kill any extension or tab, highlight it and click End process to terminate it
8 – Turn on DNS pre-fetching
This tool causes Chrome to automatically perform Domain Name Lookups for all links currently displayed on the page, cutting down the DNS resolution time if the user requests to follow any of the links.
To enable this option, do the following:
Enter Settings from the Chrome menu
Scroll down and until you find Show advanced settings. Click this option
Tick the box against Predict network actions to improve page load performance
-
Nothing gives an internet user more pleasure than to launch a robust browser and load webpages in a snap. If you chat online or stream videos regularly, there is certainly no need elaborating this point any further. Acknowledging this need, Google introduced its own web browser.
To unleash Chrome at its full strength, there are still a few ‘under the hood’ adjustments that you can make to further improve its capabilities. Continue reading this article and follow through the mentioned tips to explore exactly what it requires to run Chrome faster.
Note: In this script the steps shown under each tip is for Windows 8 (8.1) however it can be applied on any Windows. Furthermore the Chrome Settings steps are applicable on Mac, Linux, Chrome OS and Android.
1 – Get the latest Chrome update
With every release, developers add new features in attempts to resolve any prior issues and enrich the overall net surfing journey. So, make sure you are using the latest version and are fully availing the newest advancements.
To check for update:
Open Google Chrome
Click the Three Bars icon displayed at the top right and select About Google Chrome
This will automatically download any available updates
Ensure tick against Google Chrome is up to date
2 – Clear Browsing Data Regularly
While keeping browser cache/history can come in handy retrieving lost work, however accumulation of unnecessary data can consume far too much of your hard drive space. This can limit your system’s performance and directly cause the browser to load slower than usual. Therefore, clear your Chrome’s past frequently and ensure you prevent any needless data buildup.
Accomplish this by following these steps:
Enter Chrome menu (Alt + E key) and choose Settings
Select History from the left pane and click Clear Browser data button
From the dialog box that opens, click the dropdown menu against Obliterate the following items from and choose the beginning of time option
Ensure checkmarks against Browsing history, Download history and Cached images and files
Click Clear browsing data button located at the bottom
Or download Wise Care 365, there is one function called ‘Common Cleaner’ in the System Cleaner Column. Scan and then clean, just two clicks will do the same work as above.
3 – Disable unwanted plug-ins
Commonly found in web browsers, plug-ins are software components that add extra features to the existing software application. While some of these may actually help the web browser perform its operations, such as Adobe Flash Player, QuickTime Player, and Java plugins, most are harmful meddling with your browser. If you believe you need to disable extra plug-ins, complete the following:
Go to chrome://plugins
To disable any unwanted plug-in, click Disable displayed alongside it.
There is also an alternate way of doing this: download Wise Plugin Manager, and do all the operations with it. It does not only control all the plugins but also add-ons and extensions like toolbars.
4 – Enable GPU acceleration
Nowadays, with such great significance laid on rich media and 3D graphics to augment online experience, rendering webpage content with system’s graphics card has become imperative. This not only relieves the CPU off the burden to manage webpages, but also shifts the responsibility to the more capable and swift hardware component, i.e. Graphics Processing Unit (GPU).
To ensure your webpages are bolstered by this strong component, enable GPU acceleration described below:
Open Chrome and type chrome://flags in the URL. Press Enter
Search GPU compositing on all pages and select Enabled from the drop down menu
Scroll down to GPU Accelerated SVG Filters and click Enabled shown underneath it
-
Overview
Your DNS cache stores the locations (IP addresses) of webservers that contain pages which you have recently viewed. If the location of the web server changes before the entry in your DNS cache updates, you will be unable to access the site.
If you encounter a large number of HTML 404 error codes, you may need to clear your DNS cache. Once you clear your DNS cache, your computer will query nameservers for the new DNS information.
How to clean your DNS cache
The following methods allow you to remove old and inaccurate DNS information that may result in 404 errors.
Windows 8
Press Win+X to open the WinX Menu.
Right-click on Command Prompt and select Run as Administrator.
Type the following command and press Enter: ipconfig /flushdns
If the command was successful, you will see the following message:
Windows IP configuration successfully flushed the DNS Resolver Cache.
Windows 7
Click the Start button.
Enter cmd in the Start menu search field.
Right-click on Command Prompt and select Run as Administrator.
Type the following command and press Enter: ipconfig /flushdns
If the command was successful, you will see the following message
Windows IP configuration successfully flushed the DNS Resolver Cache.
Windows XP, 2000, or Vista
Click the Start button.
On the Start menu, click Run....
If you do not see the Run command in Vista, enter run in the Search bar.
Type the following command in the Run text box: ipconfig /flushdns
-
Manage Priorities
It is sometimes required to run specific programs faster, and smoother than other processes. This can be done by setting their priority levels, and alter the amount of system resources, including memory allocations, to these particular programs. Execute the following to accomplish this task successfully:
Open Task Manager by pressing CTRL + SHIFT + ESC keys
From the Processes tab, right click the program you want to modify priority of, and click Go to details
While in the Details tab, right-click the process and expand Set priority
Choose the desired option according to your priority needs
Run Memory Diagnostic tool to cure memory problems
Like any other computer component, RAM needs to be in tip-top state to operate effectively and efficiently. This would mean correcting all invalid memory bits, and storing data in a perfect way. To corroborate the health of RAM, Windows comes with an in-built memory diagnostic tool that can be accessed from Control Panel:
Type “control panel” in the Start Screen (Windows key)
Click Control Panel icon from the search results
Click System and Security
Scroll down to choose Administrative Tools
Locate and double click Windows Memory Diagnostic
Follow onscreen instructions
Run Wise Memory Optimizer
Wise Memory Optimizer helps you free up and tune up the physical memory taken up by some useless applications to enhance PC performance. Not only can Wise Memory Optimizer trim memory usage instantly, it can be programmed to start itself. As long as it's open, you can tell the program to optimize your memory when it reaches critical levels.
Restart computer when idle
Most computer problems, including memory issues, can be healed by performing a system reboot. When you reset your computer, all RAM is wiped out and software codes are restarted. This prevents any program buildup and ensures the computer has empty RAM space when it starts again.
Furthermore, reboots can also cure memory leaks, which is a phenomenon that occurs when a program fails to release the occupied memory when closed. Caused by incorrect program shutdowns, this problem can be solved by restarting the PC and clearing out all potential leaks in memory.
If applying the above optimization tweaks did not provide you with the RAM boosting results you were expecting, I would suggest you start tuning your processor. To start-off, run a full PC scan for malware, virus, or other malicious software, and remove them entirely from your system. These harmful elements work as parasites; consuming your processing power in return for nothing but disaster. Secondly, check your hard drive for any errors, and perform defragmentation to keep it fully optimized for its cooperative role with CPU and RAM. To do this, follow this procedure:
Open Computer
Right-click the Hard Drive you want to scan
Choose Properties
Open Tools tab
Click Check under Error checking to check drive for system errors. Follow the onscreen instructions
Next, click Optimize under Optimize and defragment drive to make the drive run with greater efficiency
-
When it comes to improving system’s overall performance, adding RAM is good way to advance forward, but it is not always the best. Instead, I would suggest you consider polishing your existing memory tool, and optimize it to the fullest before you go around shopping for some more. This would involve making a few adjustments in computer processes, along with tampering with certain PC settings to minimize memory utilization and maximize performance.
To help with your challenging, yet exciting journey, here are a few tips and tricks that guarantee outstanding results, and promise to bring you a better computing future.
But first, let’s highlight the core component of our discussion, the RAM, and understand how it cooperates with the system to run programs.
What is RAM and How It Works?
RAM, also called Random Access Memory, is a form of computer storage unit that allows contained data to be accessed randomly. This differs from other storage devices, such as hard disks, CDs, floppies, etc., who read and write data only in a predefined order, varying application loading time depending upon their physical location.
Every software uses memory for its operations. When you load a program, for example word processor or a browser, the CPU (Central Processing Unit) extracts the required executable (.EXE) and other crucial files from your hard disk and stores it into RAM. All operations are then executed from this RAM, rather than accessing hard disk which is a much slower process. The greater the space, the larger the capacity to hold programs and run multiple tasks simultaneously.
Sometimes, the computer may run short on physical memory, probing you to terminate running programs before loading any further. Not only is this frustrating, but also alarming for the user who goes on closing down all applications. However, that is neither convenient nor, practical. Instead, here a few recommended ways to increase memory space and optimize RAM to the fullest.
Monitor RAM usage
The first step towards computer enhancement is to monitor system processes, and see which programs use the most memory. If found unnecessary, they can be then closed or disabled to free up useful space for other processes. To do this, use the Windows built-in Task Manager tool demonstrated here:
Open Task Manager by pressing CTRL + SHIFT + ESC keys
Click Processes tab
This will show all processes currently running on the system
Click Memory column to list all processes according to their memory consumptions descendingly
Highlight any unrequired program and click End task to close that application
Increase Virtual Memory Size
Virtual memory works by using hard disk space as temporary storage for data that would normally be saved in RAM. The computer searches memory unit for areas that have not been utilized recently and moves them onto the hard disk. This frees up memory space for new applications, and gives a feeling of “unlimited” RAM to the user.
Here is how to do it in Windows 8.1:
Press Windows key and type computer
Right-click Computer icon and choose Properties from the bottom
From the System box, navigate to Advanced System Settings
View Advanced tab
Click Settings displayed under Performance
In the Performance Options box, go to Advanced tab
Click Change button under Virtual memory
Clear Automatically manage paging file size for all drives
Choose the drive that contains the paging file you want to change
Enable Custom size, type a new size in megabytes in the Initial size (MB) or Maximum size (MB) box
Click Set, and then click OK to confirm your decision
-
Every single day, desktop computers are used for both personal and professional reasons. Like many others, however, you may not feel you know enough about these incredible devices. Fear not, because this article will surely change that.
If you are concerned with your computer's speed, then start things off with a boot check. You will be able to find this information in the start menu. From here, examine which programs are loading when the computer boots. If there are programs listed that you don't use, set them so they don't automatically start. This makes it so your computer runs faster.
Try to purchase an affordable desktop computer that has the minimum features you need. Some people purchase models with features they will never use at a price that is more than they can afford. Be selective with the components and features to save some cash.
Carefully choose your products when building a desktop yourself. Certain processors are compatible with only certain motherboards. Same with the RAM and their compatibility with motherboards. When purchasing your pieces, ensure cross compatibility. This will cause less headaches when you build your own computer.
Measure the area in which you plan to place your computer. There are many different sizes of desktop computers out there. It really depends on the make and model. Some have smaller profiles, where others may take up more vertical space. Know what you can fit into the location that you are considering.
When the time comes for you to purchase a desktop computer, make sure that any software that it comes with is legal. You should always receive the CD and key in order to make certain that you will not find yourself in legal trouble or unable to receive software updates down the road.
Dust the interior of your computer once a week to keep it running well and make sure that the fan is providing proper cooling. The case can be unscrewed easily, and then it is easy to spray the interior with compressed air. Doing so keeps your computer insides clean and lets the cooling system keep the hardware at good temperatures.Prior to making your computer purchase, examine various reviews on reputable tech sits. Dealing with the many choices available can seem overwhelming, however even checking out a editor's recommended list or a couple of reviews will help you get a better computer for your money.
If you're dreaming of playing video games for fun, you must have a desktop computer meant to handle gaming easily. You need about 4GB of memory, a display with high resolution, and an adequate video card to start with. You can also get keyboards and controllers specially designed for a better play experience.
If you are wanting to buy in a "green" fashion, search out a mini-PC. They don't require as much electricity for operation, but they still have plenty of processing power. This is a great choice if you do little more than read and send emails, surf the internet and create the occasional document.
After you have read through all of this information, you should have fun buying your next computer. Consider these tips and use them when you're searching. Follow the advice located above to help find a computer that suits your needs without spending a fortune. -
If your copy of Google Chrome has taken on a sudden and inexplicable hatred for Shockwave Flash, we’re here to help. Read on as we show you how to tame Chrome and get it to play nice with Flash.
More so than other browsers, Google Chrome is particularly susceptible to a specific but not uncommon situation in which it simply will not coexist peacefully with Adobe Flash—frequent slow downs and annoying crashes are common as a result. The following tutorial will help you get Chrome back to its speedy self.
What Causes The Issue?
The reason we’re talking about Chrome and not, say, Firefox, is because of the way Chrome handles Flash content. While other browsers call upon the Flash installation of the host system, Chrome includes an internal Flash installation. When everything goes smoothly, this isn’t a problem—the internal Flash installation is updated with every new Chrome release.
Unfortunately, things can fall apart pretty easily if Chrome gets confused and attempts to utilize both the OS installation of Flash and the internal Chrome installation of Flash. The result is serious browser lag, temporary lockup, and then a browser-wide crash of all active Flash instances. You don’t realize how many web sites use Flash until every single tab locks up with a crash warning—”The following plug-in has crashed: Shockwave Flash”
How Do I Know A Conflicting Flash Installation Is Causing The Crashes?
First of all, despite the warning about Shockwave, the actual warning has nothing to do with Adobe Shockwave, which is a separate program/multimedia system from Adobe Flash. Second, while not every instance of Flash flaking out in Chrome can be attributed to a Flash install conflict, we’ve found it to be the most common reason users are experiencing Flash-related problems.
How can you tell if a Flash conflict is the source of your trouble? Run Chrome. In the address bar, type about:plugins in the address bar. After you press enter, you’ll be greeted with a list of all the plug-ins installed in Chrome (this is different from user-installed Extensions). Look down the list of plug-ins for the Flash entry. If the entry looks like Flash (2 Files)there is a very good chance the source of your Flash-related crashes is a conflict between the two.
In the upper right hand corner of the browser window, there is a small toggle labeled [+] Details. Click on that toggle to expand the entries for all the plug-ins. Return to the entry for Flash.
You should see something like: two entries for Flash, one for the internal Chrome installation and one for the host OS’s installation.
You need to click on the Disable link for Chrome’s internal installation of Flash (make sure you disable the one located in Chrome’s AppData folder and not the separate stand-alone Flash installation).
Go ahead and close the tab and then close Google Chrome. Restart Chrome and resume normal browsing—visit Adobe’s test page to ensure everything looks good.
Remember, you’ll no longer be getting automatic updates with each Chrome upgrade. Make sure to check for updates at Adobe’s Flash download page and/or turn on the update check in your local installation of Adobe Flash.
Check For Conflicting Software
Some software on your computer can conflict with Google Chrome and cause it to crash. This includes malware and network-related software that interferes with Google Chrome.
Google Chrome has a hidden page that will tell you if any software on your system is known to conflict with Google Chrome. To access it, type chrome://conflicts into Chrome’s address bar and press Enter.
You can also check the Software that crashes Google Chrome page on Google’s website for a list of software that causes Chrome to crash. The page includes instructions for solving conflicts with some conflicting software.
If you have conflicting software on your system, you should update it to the latest version, disable it, or uninstall it. If you are not sure which software a module is related to, try Googling the name of the library.
Other Fixes
If for whatever reason disabling the built-in Flash doesn’t help, we suggest playing around with different combinations. Try turning off the OS Flash installation instead of the built-in Flash installation for example. Also, try visiting a flash-based web site while Incognito Mode (when you enter Incognito Mode it turns off all your Extensions which may or may not be causing issues with Flash). Finally, as a last ditch effort, you can reinstall Chrome (if Flash works in every other browser but Chrome, this is likely the only option you have left).
-
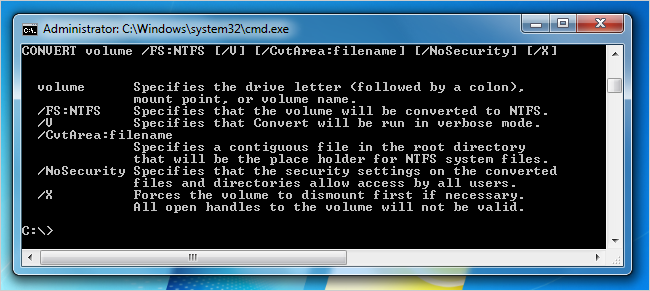
If you’ve got a hard drive formatted with the FAT32 file system, you might have found that you can’t copy large files to that drive. So how do you fix that, and convert the file system over to NTFS? Here’s how.
Scratching your head? Here’s the deal: the FAT32 file system, which most external drives are still shipped with, can’t handle files larger than about 4 GB in size—which means most full-length movies and anything really large, like a virtual machine. If you do try and copy a file, you’ll get an error just like this one:
It’s worth noting that FAT32 works just fine on just about any OS, but NTFS is usually read-only on Linux or Mac OS X.
Convert the File System Directly
If you’ve already got a ton of files on the drive and don’t have the free space to move them around, you can convert the file system directly from FAT32 to NTFS. Just open up an Administrator mode command prompt by right-clicking and choosing Run as Administrator, and then you can type convert /? to see the syntax for the convert command.
In our example, the drive letter is G: so the command we’d use is this:
convert G: /FS:NTFS
The conversion process might take a while, especially if you’ve got a really large drive.
It’s pretty simple, right?
Option 2: Reformat the Drive
If you don’t have a ton of data on the drive, the best bet is to copy any data from the drive to somewhere else, reformat the drive, and then copy the data back. All you have to do is right-click on the drive and choose Format.
And then select NTFS in the file system drop-down.
Finish the format, and copy your data back. Nice and easy.
-
If you have a small solid-state drive and really want more hard space, there are geekier ways to reclaim hard drive space.
Not all of these tips are recommended — in fact, if you have more than enough hard drive space, following these tips may actually be a bad idea. There’s a tradeoff to changing all of these settings.
Erase Windows Update Uninstall Files
Windows allows you to uninstall patches you install from Windows Update. This is helpful if an update ever causes a problem — but how often do you need to uninstall an update, anyway? And will you really ever need to uninstall updates you’ve installed several years ago? These uninstall files are probably just wasting space on your hard drive.
Windows 7 allows you to erase Windows Update files from the Windows Disk Cleanup tool. Open Disk Cleanup, click Clean up system files, check the Windows Update Cleanup option, and click OK.
If you don’t see this option, run Windows Update and install the available updates.
Remove the Recovery Partition
Windows computers generally come with recovery partitions that allow you to reset your computer back to its factory default state without juggling discs. The recovery partition allows you to reinstall Windows or use the Refresh and Reset your PC features.
These partitions take up a lot of space as they need to contain a complete system image. On Microsoft’s Surface Pro, the recovery partition takes up about 8-10 GB. On other computers, it may be even larger as it needs to contain all the bloatware the manufacturer included.
Windows 8 makes it easy to copy the recovery partition to removable media and remove it from your hard drive. If you do this, you’ll need to insert the removable media whenever you want to refresh or reset your PC.
On older Windows 7 computers, you could delete the recovery partition using a partition manager — but ensure you have recovery media ready if you ever need to install Windows. If you prefer to install Windows from scratch instead of using your manufacturer’s recovery partition, you can just insert a standard Window disc if you ever want to reinstall Windows.
Remove Some System Files
In the System Cleaner column of Wise Care 365, there is one function called System Slimming, you can delete the unnecessary system files like Windows Installer Baseline Cache or Japanese IME you think you will never need. If you are not so sure of which to delete, you can choose Recommended.
Note: Windows installer baseline cache could be deleted, but aware that by removing the baseline cache for a product, future repair, patch install, and patch uninstall scenarios may require your original installation media. If you have the drive space it is recommended that you keep the baseline caches available.
Disable the Hibernation File
Windows creates a hidden hibernation file at C:\hiberfil.sys. Whenever you hibernate the computer, Windows saves the contents of your RAM to the hibernation file and shuts down the computer. When it boots up again, it reads the contents of the file into memory and restores your computer to the state it was in. As this file needs to contain much of the contents of your RAM, it’s 75% of the size of your installed RAM. If you have 12 GB of memory, that means this file takes about 9 GB of space.
On a laptop, you probably don’t want to disable hibernation. However, if you have a desktop with a small solid-state drive, you may want to disable hibernation to recover the space. When you disable hibernation, Windows will delete the hibernation file. You can’t move this file off the system drive, as it needs to be on C:\ so Windows can read it at boot. Note that this file and the paging file are marked as “protected operating system files” and aren’t visible by default.
Shrink the Paging File
The Windows paging file, also known as the page file, is a file Windows uses if your computer’s available RAM ever fills up. Windows will then “page out” data to disk, ensuring there’s always available memory for applications — even if there isn’t enough physical RAM.
The paging file is located at C:\pagefile.sys by default. You can shrink it or disable it if you’re really crunched for space, but we don’t recommend disabling it as that can cause problems if your computer ever needs some paging space. On our computer with 12 GB of RAM, the paging file takes up 12 GB of hard drive space by default. If you have a lot of RAM, you can certainly decrease the size — we’d probably be fine with 2 GB or even less. However, this depends on the programs you use and how much memory they require.
The paging file can also be moved to another drive — for example, you could move it from a small SSD to a slower, larger hard drive. It will be slower if Windows ever needs to use the paging file, but it won’t use important SSD space.
Configure System Restore
Windows seems to use about 10 GB of hard drive space for “System Protection” by default. This space is used for System Restore snapshots, allowing you to restore previous versions of system files if you ever run into a system problem. If you need to free up space, you could reduce the amount of space allocated to system restore or even disable it entirely.
Of course, if you disable it entirely, you’ll be unable to use system restore if you ever need it. You’d have to reinstall Windows, perform a Refresh or Reset, or fix any problems manually.
-
When you use Windows 7 PC, typing anything into the Start Menu search box returns exactly what you want instantly—but what about once you’ve built up loads of files? It tends to get really slow, but here’s how to fix it.
Make the Start Menu Only Search Applications
The first thing you can do is change the Start Menu search box to only search through your applications in the Start Menu, rather than finding documents, pictures, emails, and going through your internet history.
Head into Taskbar and Start Menu Properties by right-clicking on the Start orb and choosing Properties, then click Customize.
Now scroll down in the list until you find “Search other files and libraries”, which you should set to “Don’t search”.
Note: only make this change if you don’t want to search for documents, pictures, etc, from the Start Menu search box. If you want to find documents, pictures, videos, etc in a quicker way, you can use Wise Jet Search, it can find all the files, folders, documents you need in your computer 3 to 5 times faster than the one built in Windows Explorer.
Increase Search Speed by Tweaking Search Locations
The second way you can tweak the Start Menu search box to work a little faster is by simply cleaning up the locations that you are indexing so less files are included in the index. This isn’t going to magically make everything all better, but it’ll definitely help if you’ve got loads and loads of files that are being indexed.
Open up Indexing Options, which you can find easily in the Start Menu search box, and then click the Modify button at the bottom of the window.
Now you’ll be able to tweak the indexed locations—if you’ve got directories with loads and loads of files that you’ll never need to search through, you should probably remove them from the search. For instance, I’ve got a couple of code directories with 10,000 files in them, so I got rid of those.
Keep in mind that if you remove items from the index, you’re removing them from the entire index—so if you have a documents folder that you frequently search via Windows Explorer, you probably should leave it enabled.
Note: once you make this change, Windows will have to do some index cleanup, so you won’t instantly see results, and depending on just how many files you have in the index, it might slow the PC down slightly for a very short while as Windows removes the files from the index. Once it’s all done, however, your Start Menu search should be a bit faster.
-
Windows 8 offers a wide variety of New features. But, a typical windows user will search for Hibernate option in Windows 8 and windows 8.1 and is really easy to enable hibernation mode inwindows 8. It is better to Shut Down and Start windows 8 because, Windows 8 has a New feature called Fast Start Up which is Smarter than Hibernation mode in Windows 8
Where is Hibernate option in Windows 8?
Win 8 hibernate - The committee of members who removed the Start menu from Windows 8 hidden the Hibernate option. The reason behind this hiding is, Windows 8 can Start and Shutdown faster that hibernation. The happy news is that, a User can enable or Disable the power options, namely: Shut-Down, Sleep, Hibernate and Restart.
Steps - how do i hibernate windows 8
Step 1 : Go to "Power Options"
First, you will need to search in Settings : Press "Win Key" + W
In the Charm search box that appears, Type "Power Options"
Select "Power Options" from the Results
Step 2 : Select What Power buttons do
In the "Power Options" dialogue window, see the left pane with a number of options to tweak the power settings of your PC.
In the "Left Pane", select : "Choose what the power buttons do"
Step 3 : Enable Hibernation mode
In the window that appears, Select : "Change settings that are currently Unavailable"
Now, Scroll down the window.
There you will see "Shutdown settings". Under that, you can "Check" the box that represents "Hibernation" and Click "Save Changes" button.
Now, you have successfully enabled the Hibernation mode in Windows 8
Now, Open Windows Charm, Settings -> Power
You will see Hibernation option listed.
Note : In the power options window, you can now enable "Hibernate on Power button press", "Hibernate on Close lid" in windows 8.An alternate way:
If you don’t want to do all the tweaks, you can use Wise Auto Shutdown instead: Open Wise Auto Shutdown---->Choose Hibernate---->Set time(we recommend that you set 1 minute from now)---->Start Task---->Confirm. Your Computer will hibernate automatically in one minute.
-
Mechanical hard disks have ruled for ages—but their reign is coming to an end. Uptake of faster, more energy-efficient solid state drives (SSDs) is increasing. Fast boot times and overall performance coupled with a decrease in prices are their major upsides, but users need to take special care of their SSDs. This post outlines the most important steps for optimizing your SSD.
Step 1 – Jump to Windows 7
Both Windows XP and Windows Vista come from an era in which SSDs were not widespread. They do not support the TRIM command which is important to boost systems’ performance and lifespans. TRIM allows Windows 7 to tell the SSD which files should be deleted and completely erases the corresponding data blocks. The moment a file is deleted from an SSD, Windows 7 not only updates the file system (as it normally would) but also informs the SSD which data blocks can be removed. These blocks are marked as free so that Windows and third-party programs can use them. On a mechanical hard disk, this happens automatically, but on SSDs (without support for the TRIM command), data blocks need to be completely erased before they can be used again—this causes a loss in performance. Windows 7 (and it’s bigger server brother “Windows Server 2008 R2″) are the only Microsoft operating systems that support the essential TRIM command.
Step 2 – Make sure that TRIM is enabled
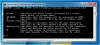
While Windows 7 officially supports TRIM, there have been cases in which it’s not enabled (or maybe not supported). To see if TRIM is enabled, open up a command prompt by clicking on the Start orb and typing “cmd” into the search bar.
Right-click on the first result (“cmd”) and click “Run as administrator”. Next, type in the command “Fsutil behavior query disabledeletenotify”.

Hit Enter. If this returns the result “= 0″, you’re good to go! Otherwise, TRIM isn’t supported and needs to be enabled. Try entering the command “fsutil behavior set DisableDeleteNotify 0″. If that doesn’t help, a firmware upgrade might be necessary to enable TRIM.
Step 3 – Do not defrag your SSD
Defragmentation is one of the more useful steps to keep your hard disk at its best. However, with SSD, defragmentation is not necessary. Read operations are incredibly fast throughout the entire disk. Thanks to the flash-based nature of SSDs, it simply doesn’t matter if data is stored in a non-contiguous manner. What most users don’t know is that defragmentation can actually be harmful to the SSD as the thousands of disk operations that occur during defrag reduce the life span of solid state cells. By default, Windows 7 should automatically disable its scheduled defragmentation—but unfortunately, I’ve seen too many cases where the built-in Disk Defragmenter was still enabled, despite the fact that an SSD was built-in! Users should make sure that it’s disabled. Here’s how: Go to the Start menu and click on “All Programs”, “Accessories”, “System Tools” and “Disk Defragmenter”. This can be even easier regulated with the new TuneUp version TuneUp Utilities 2012. It recognizes the SSD drive and excludes it automatically from defragmentation.
Go to “Turn off schedule” and make sure that Windows does not defragment your SSD drive (probably drive C:).
Step 4 – Disable SuperFetch, Prefetch, ReadyBoost, and ReadyDrive
Most performance-related features, such as SuperFetch, Prefetch, ReadyBoost, and ReadyDrive (for hybrid disks), should automatically be disabled when using an SSD, according to Microsoft’s blog post.
“If the system disk is an SSD, and the SSD performs adequately on random reads and doesn’t have glaring performance issues with random writes or flushes, then Superfetch, boot prefetching, application launch prefetching, ReadyBoost and ReadyDrive will all be disabled.”
While these technologies were designed to address certain performance bottlenecks, they are not necessary on SSDs. Windows 7 automatically disables all of the features mentioned above. If not, please check the SuperFetch service and the Prefetch feature and turn these off—but make sure that your SSD is fast enough. It could be either that Windows 7 didn’t correctly identify your hard disk as an SSD (and thus left all the features on) or that it deemed your SSD to be too slow (and left them on, as well). There’s only one way to find out: Disable SuperFetch and Prefetch and see if performance decreases at all. To do this, go to “Control Panel”, “System and Security”, “Administrative Tools”, and “Services”. Scroll down until you see the “SuperFetch” entry, double-click on it, and choose “Disabled” from the list.
Hit “OK” and close all windows. Next, open up the registry; click on the Start orb and type in “regedit”. Hit Enter, and go to “HKEY_LOCAL_MACHINE\SYSTEM\CurrentControlSet\Control\Session Manager\Memory Management\PrefetchParameters”. Double-click on “EnablePrefetcher” and enter “0″ (default value is “3″) to disable the Prefetcher.
Now conduct any test (e.g. some of the performance tests we usually run) to determine if performance stayed the same or not. If performance is the same as before, leave SuperFetch and Prefetch disabled. If performance decreased, go back and undo all the steps you previously took!
Reduce file operations
SSDs are perfect for anyone with a need for raw performance, but you’ll need to treat them right. Follow our advice and avoid unnecessary file operations in order to maintain your system’s performance and prolong its lifespan. Use the SSD as a system drive (Windows, third-party programs and important data), and move your huge files (like pictures, music and videos) to a secondary mechanical or external drive.


An Intro To Your Windows Registry
in WiseCleaner Advices & Suggestions
Posted
Your PC’s Windows registry can cause a number of problems for your computer, from a slow running computer to an actual computer crash but it’s easy to fix. Unfortunately, the registry is also a vital part of your Windows operating system. So you can’t solve these types of problems just by eliminating it entirely.
What Is the Windows Registry and Why is It Important?
The Windows registry is the central nervous system of your computer. It acts as the central switchboard that tells each program when it should activate, and whether or not a given user has the power to activate it. This is true for the programs you activate yourself (such as MS Word or a browser). It is also true for every computer process that works in the background.
Sound complicated? It’s actually an improvement over the way PCs once worked. Improved operating speed and stability when it was first released with Windows 3.1. Without it, your computer would take much longer to perform run the chain of commands required to perform even a simple operation.
Your registry also determines when and in which order each executable function should run. It controls which one of your programs begin immediately on starting you Windows PC. This means that if you modify your registry, you can actually make your computer start up faster.
The registry also controls who can operate which programs on your computer. Most guest accounts don’t have the same privileges as computer owner accounts, for example. Many people may wish to modify which programs or files that guest accounts or children’s’ accounts may be able to use.
All of the above information is written and stored in your computer’s registry—without your ever having to access the registry itself.
A Closer Look: How You Change Your Registry Without Knowing It
You can spend your whole life without ever interacting directly with your registry. This is recommended for most non-technical users. As you will learn later, even technically-oriented users are often intimidated by this database!
All the same, you do make changes to your registry on an almost daily basis. Most of us don’t notice it. But changes are made in this particular section of Windows every time you:
Install new software (An “Installation Wizard” is just a fancy way of making these changes)
Change settings on your software
Update software
Update or change settings on Windows
Create or modify a user account
Update or change settings to your Windows operating system
All of these changes are necessary to keep your computer running in the most secure, vital, and up-to-date fashion. Unfortunately, after enough of these changes, most Windows computers begin to slow down.
Registry Errors and Slow Running PCs
As you can see, your registry is constantly being modified. Many of these modifications are made without your notice, such as when a program updates, or when a third party application runs from your browser.
Over time, entries to the registry build and start to “clog” the system. Your computer may slow down or even crash because of:
1. Multiple copies of each entry (often updated over time)
2. Out of date entries
3. Lingering entries from software that has been removed from the computer
4. Incorrect or invalid entries that were mistakenly installed
5. Entries from viruses or other malicious programs (antivirus programs do not always remove every bad registry entry)
6. Registry files that have become corrupt over time with disk fragmentation
At best, these registry errors will slow your computer startup time and give you a slow running computer overall. At worst these entries can cause things like screen freeze and computer crash. Aside from being inconvenient, a computer crash can result in lost personal files—family photos, financial information, and anything else you might keep on your computer.
How Can I Fix the Windows Registry and Speed Up My PC?
It is possible to go through your Windows registry by hand and check each entry against the entries that match up with each program on your computer.
For those who don’t want to fix the “Windows Central Nervous System,” by hand, there are two choices: A trusted PC technician or a trusted registry cleaning software ( Here I recommend Wise Registry Cleaner, it is fast and stable. With the automatic Registry Backup feature, you can always restore to the previous point when your PC malfunctions after the registry cleaning). The choice of which is entirely up to you. The important thing is to have your registry fixed before problems get worse!