Linkin
-
Posts
155 -
Joined
-
Last visited
-
Days Won
36
Everything posted by Linkin
-
1.Open Internet Explorer, the default Web browser included in all copies of Microsoft Windows. Click "Tools" and select "Internet Options" from the drop-down menu. In the dialog box that appears, select the Security tab. Click on the Internet icon and choose "Custom" in the security levels listed. Uncheck the box next to the following security options: Download Unsigned ActiveX Controls; Initialize and Script ActiveX Controls Not Marked As Safe; and Scripting of Java Applets. Removing these options will decrease the amount of data that Internet Explorer tries to download, making Web pages with these elements load faster. Disabling these features can also make the Internet Explorer browser more secure. 2.Return to the main "Internet Options" window in Step 1. Drag the slider for Internet Explorer's cache to the right to increase the amount of hard drive space that the browser uses to store commonly-accessed Web page data. By accessing locally-stored data instead of downloading it from the Web, your browser is able to load websites at a faster rate. 3.Click "Start" and select "My Computer." Open the C:\ drive. Click "Documents and Settings," and double-click on "Local Settings." Open the "temp" file and clear all the contents. 4.Install OpenDNS on your computer (link in the Resources section). This lets your browser access the OpenDNS cache, significantly speeding up your Internet connection by downloading pre-saved website data stored on the OpenDNS servers.On a PC, click "Control Panel" in the Start menu. Click "Properties," then open the "Internet Protocol (TCP/IP)" tab and select "Properties." Add 208.67.222.222 to the Preferred DNS Server list. Click "OK."
-

Shockwavw Flash has crashed
Linkin replied to Vilmar's topic in Computer Trouble-Shooting Discussion
To fix the “Shockwave Flash has crashed.” error in Chrome you need to disable Chrome’s embedded Flash Player. The steps are: Open a new tab in Chrome and type the following in the address line: about:plugins The resulting screen should look similar to this screen. Click on “Details” to expand the “Flash” section to reveal a screen similar to the one below. Disable all the entries that begin withC:\Users\Ianh\AppData\Local\Google\Chrome\Application\ in the “Flash” section so that each disabled entry has a gray background. There may be more than one. Leave any that don’t begin with that location Enabled (with a white background). Close Chrome completely. Reopen Chrome and try to watch the video again. -
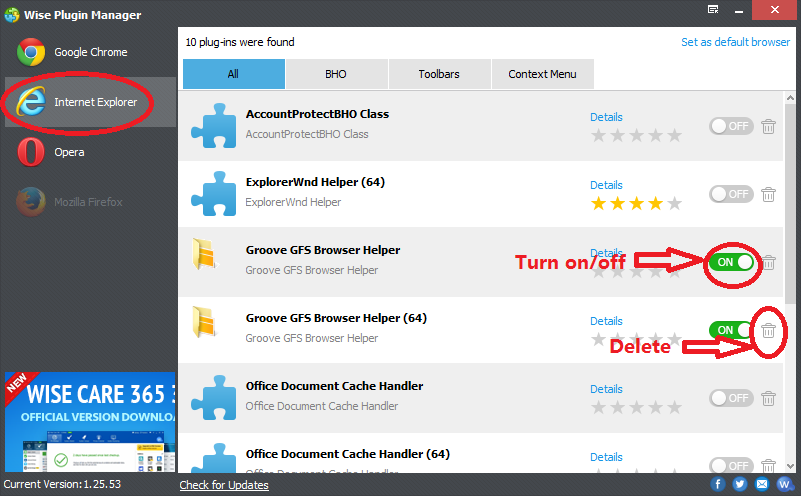
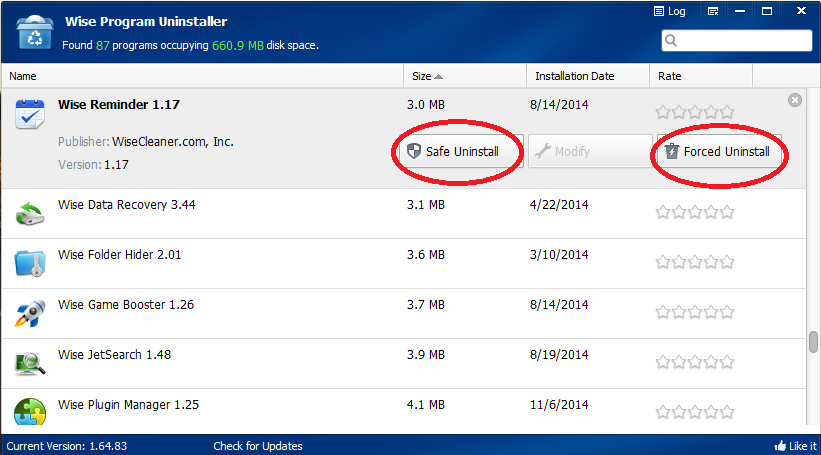
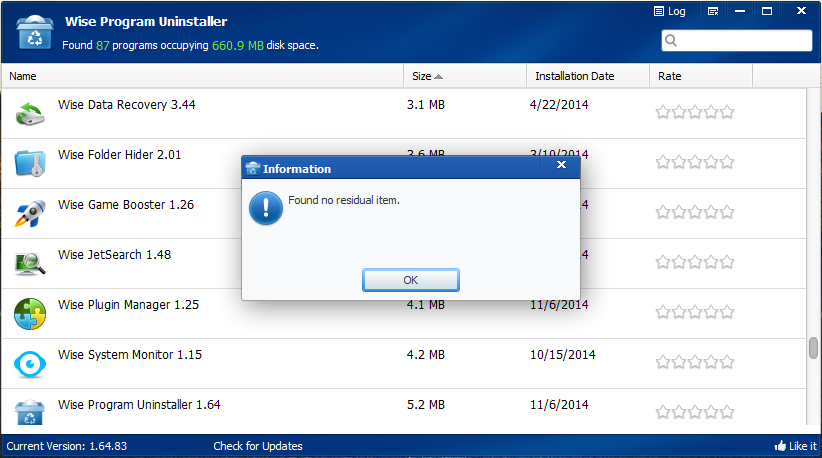
How to Recover Deleted Files in Windows For Free? Check this video 1. Unwanted toolbars Every time you browse the internet, some toolbar which you don't remember installing keeps annoying you. Well whether you installed it by accident or not, here's a guide on how to remove unwanted toolbars from your browser. Toolbars can end up on your computer in various ways. The most common is when you install software and forget to untick the box for the additional toolbar installation. How to remove toolbars from Internet Explorer, Opera, Firefox and Google Chrome? Instead of opening the browser and deleting the toolbars in Manage Add-ons or Extensions, you can download Wise Plugin Manager ( http://www.wisecleaner.com/wisepluginmanager.html ). You can take full control of all the plugins, add-ons and extensions like toolbars of the four most used browsers. Click the corresponding tab of the browser in Wise Plugin Manager, you will see all the toolbars, plugins and add-ons existing in the browser. There you can turn on/off or delete any of them with one click. Note: You have to make these operations when the browser is closed. 2. Unwanted programs The same situation goes with the unwanted programs. Programs you don’t even remember installing or you don’t want any more keeps taking up space. In most cases, it also comes with the installation of other programs. You may think it is pretty simple, find and open Control Panel then click Uninstall a program. Why even bother talking about it? Hear me out, it might not be that simple. Problem is the installation of programs may leave some residual entries and invalid files. The accumulation of these useless leftovers can slow your PC down and make it unstable. Some broken or stubborn programs just can’t be uninstalled. So allow me to conclude a little bit, while uninstalling a program, we got two concerns: 1. Cleaning the leftovers of a uninstalled program. 2. Removing a broken or stubborn program thoroughly. In that case, a professional program uninstaller is quite necessary. I use a freeware named Wise Program Uninstaller It has a very concise interface, which I like very much. Its two main functions( Safe Uninstall, Enforced Uninstall) deal with the two concerns perfectly. When you click the Safe Uninstall, it executes the uninstaller that came with this software and after that it scans and analyzes the registry entries and files associated with this program and then make a list of them for you to delete. So it is a complete removal of the uninstalled software. For some broken or stubborn software that just can’t be moved by windows, you can execute the Enforced Uninstall. It makes the uninstall very simple and thorough. What is really amazing is that it also provides the Modify function for some software, fixing the errors existing in the program or reinstalling the software to make your PC run in a more stable state.


-
- 1
-

-
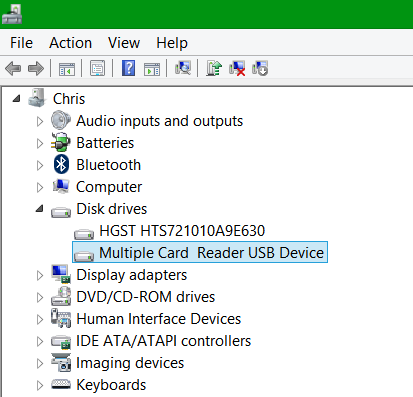
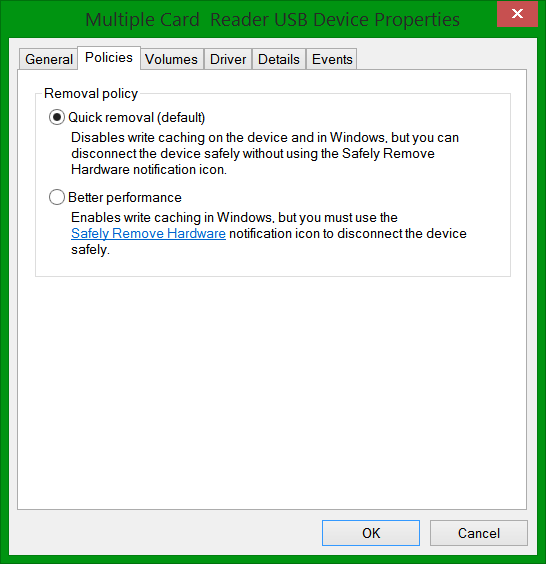
How to Recover Deleted Files in Windows For Free? Check this video Most computer users know that we should click the safe removal icon before we actually unplug the USB flash drive or external drive. Or else it will lead to data loss, corrupt USB drive, blah blah blah. But it is real convenient if we can just unplug it when we are done using it. In this tutorial, I will show you how to safely remove your USB drive just by unplugging it. Note: For some computer this option may be enabled by default, so you can follow this tutorial to find out if it is enabled or not. Here is how: Step 1: Plugin your USB flash drive or external drive into your desktop or laptop computer, then search for device manager Step 2: Press Enter on your keyboard and Device Manager window will open Step 3: Expand Disk Drive tree and locate your external removable drive. On my computer for example its called Multiple Card Reader USB Device. Step 4: Right mouse click on that removable drive and from context menu choose Properties Step 5: Now choose Policies tab Step 6: In this new window you should have two options 1. Quick Removal (Default) 2. Better Performance Step 7: If first option Quick Removal is selected you don’t have to make any additional changes and simply close the window. Otherwise if it’t now selected, do so and then click OK to save changes. Next time simply unplug your external USB drive ir hard drive without any worries that you may damage him or its data. Reminder: If you do prefer a better transfer speed, you should choose Better Performance, and defrag the hard drive of your computer and external hard drive more often with Wise Care 365. But don’t defrag your USB flash stick because it will decrease its lifespan. Of course, with Better Performance selected, you should click safe removal icon and then unplug the USB drive.


-
- 4
-
-
- safe removal
- remove USB drive
- (and 2 more)
-
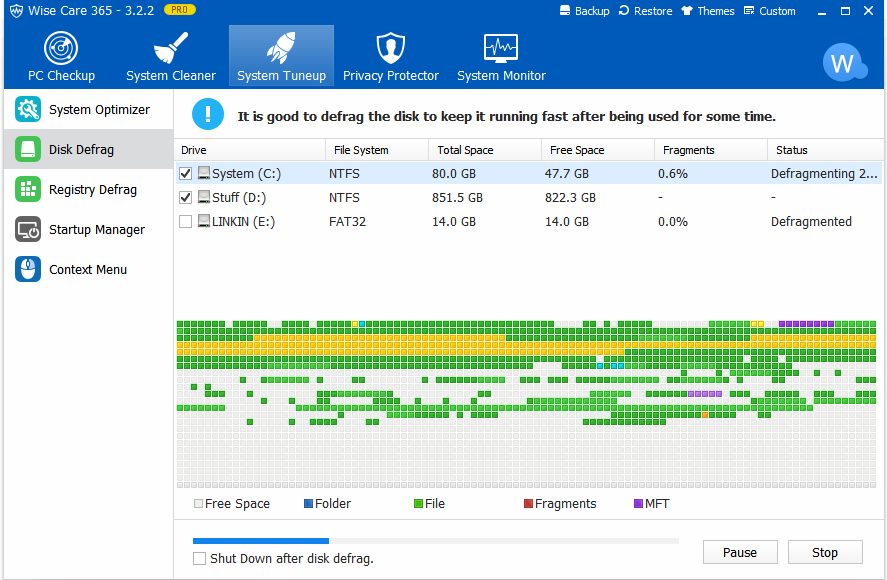
How to Recover Deleted Files in Windows For Free? Check this video Despite the incredible development of smart phones and tablets, there are still 60% percent gamers in America game on PC. Dozens of new games releasing every year require elevated system resources for an uninterrupted gaming experience. There is one common thing that is on every gamer’s mind: How do I optimize my PC for gaming? Of course we know, buying the most cutting-edged CPU, GPU and SSD(solid state drive) will definitely improve the gaming experience. The thing is not all of us gamers can afford to spend such a fortune on them. In this article, I will show you tips and tricks to improve the gaming performance while spending no money or just very little money. 1. Add more RAM If you have read similar articles, some may suggest you increase the virtual memory. I would not recommend doing so. Because loading data from the hard disk is slower than loading from RAM. So I strongly recommend adding more RAM instead of increasing the virtual memory. With more memory, you can load game data more easily, without the need to access your disk drive. If you’re an active gamer, you should consider upgrading your PC or notebook to 8 GB or more. You can refer to my other article on how to choose the right RAM to upgrade for better performance( http://forum.wisecleaner.com/index.php?/topic/7443-how-to-choose-the-right-ram-to-upgrade-ram-of-windows-pc/ ). But if you don’t have enough RAM and really need more virtual memory, you can increase Virtual Memory to assimilate a larger size of data making more room for the memory to facilitate the running game. Here is how: 1. Go to Control Panel, view it in icons, and click ’System’. 2. In the right side of System window, click Advanced system settings 3. Go to the Advanced tab and click Settings under Performance section 4. In the Performance Options window, go to the Advanced tab click Change button 5. Click to choose the Custom size for virtual memory 6. Put Initial size and Maximum size in MBs, and click OK button to save changes 7. Click OK on Performance Options window and then System Properties window It is directed to restart your computer in order to take effect of the changes you have made. 2. Optimize the startup items. When you start Windows, there are many applications and services that run automatically. Overall performance can be noticeably improved by stopping all of the unnecessary programs that bog down your PC and by running Windows without any third-party services. To optimize the startup items, download Wise Care 365, and click ‘System Tuneup’ in System Tuneup section. There you can disable all the apps and services according to your own needs. 3. Update to the latest graphics driver If you’re an avid PC gamer, you may own an Nvidia or an AMD graphics card. Both manufacturers update and fine-tune their drivers on a monthly basis to help improve gaming performance. Or maybe you have a laptop that has only one intel integrated graphics card. Updating your driver to the most recent version should deliver a slight increase in performance every time, and potentially make the entire experience smoother. A. Nvidia GeForce owners go to http://www.geforce.com/drivers. B. AMD users go to http://sites.amd.com/us/game/downloads/Pages/downloads.aspx C. For Intel HD Graphics owners, I suggest you go to http://www.intel.com/p/en_US/support/detect?iid=dc_iduu and download the Intel Driver Update Utility to update the driver. 4. Download the latest patches for your games. Like any piece of software, games are never completely finished upon release. After the games hit the shelves, the development teams are still fixing bugs and working to increase games performance. As such, users should get the latest patches available for them. Depending on your resolution settings and your specific machine, you will gain a couple of frames per second. This can mean the difference between a choppy and smooth gaming experience. 5. Defragment your Disk Hard Disk Drives continuously absorb new data. Frequent addition of new information and deletion of the old one causes the data to form clutters. It is then hard for system to track down the scattered game files, resulting in lags and pauses. To rearrange these fragmented files and data, open Wise Care 365, check all the partitions in your computer and defragment all of them. Please not that if you are having SSD drive in your machine, it does not need to be defragmented, as it does not engage any fragments of information. 6. Clean Windows Registry Windows Registry is a set of information that contains specific instructions for applications, drivers, and services. System refers to the relevant information in registry, whenever an activity is performed. Such continuous use of registry makes it corrupted by assimilating errors. To attain an enhanced experience of gaming, you need to fix registry errors using a reliable registry cleaning software like Wise Registry Cleaner. 7. Uninstall those old programs you don’t need Windows keeps getting slower and slower with each program you install on your PC or laptop – and that has a direct effect on all of your games! The reason for this is that a lot of programs run some sort of background activity, even when they’re not being used. Download Wise Program Uninstaller and uninstall the programs you do not need. The good thing about this uninstaller is it clears all the residual items left behind after the built-in uninstaller finished its job. 8. Free Up Hard Drive Space Make sure you still have some space left on your hard drive. Not only does this give you little breathing room, your computer will also run slower because of it. Admit it, in most cases you don’t need half of what’s stored on your hard drive right now. So get rid of it. 9. Before you play, close all other Processes, Services, and applications If you are playing, you are definitely not doing anything else. All the active process, services and applications running in the background, either visible or not, are consuming your memory and other system resources to some extent. It is obvious that a game application requires adequate MBs of free memory to perform simultaneous actions easily. To provide this free memory, it is submitted to close down each running application (except the game) to free up the memory. Instead of closing the programs and services one by one in the Task Manager, you can download Wise Game Booster to close them all by one click, better yet, it also optimizes relevant system settings for better gaming experience.
- 3 replies
-
- 10
-